Saturday, October 27, 2012

Greek Yogurt: Easier Than You Think

Greek yogurt is all the rage these days but boy howdy is it expensive!  I've seen prices approaching SIX bucks for a quart of the stuff.  Yeah, I won't pay that much for a quart of anything.  Additionally, almost all so-called Greek yogurt has additional ingredients (like pectin) to make it thicker.  Pectin isn't necessarily a bad thing per se, but it's a commercial shortcut that isn't necessary if you take the time to do it the old-fashioned way at home.

Authentic natural Greek style yogurt can be made for little more than the cost of the milk itself (currently a $2.60 gallon of whole milk becomes 2 quarts of Greek yogurt).

Making yogurt is a multi-step process that seems time consuming and confusing at first, but it's really very simple, and can be done with a few inexpensive tools you probably already own.

(Pictures at the end of the post)

Preparation and cooking time: less than one hour.
Processing time: 24 - 36 hours.

Ingredients:  
  • Milk: anything from skim to whole milk will work, but whole milk will produce a slightly thicker, creamier yogurt.  Embrace the fat, I say!
  • Yogurt starter:  Any plain or flavored yogurt that contains "Live and Active" cultures (it will say this on the label).  The starter imparts its flavor to the finished product, so choose one that you like.  My favorite starter is Mountain High Plain; Dannon and Activia brands also should work.  My In-Laws use Fage greek yogurt as a starter. You can also purchase powdered yogurt culture packets from the health food store.

Equipment:  
  • Stainless steel saucepan or pot with lid.
  • Kitchen thermometer.  My favorite has an increasing temperature alarm as well as a decreasing temperature alarm, but any accurate thermometer will do.
  • Ice chest or cooler: large enough to easily fit your saucepan or pot inside.
  • Colander or strainer that fits snugly inside a large pot or bowl
  • Cheesecloth

Step 1:  Measure milk into a stainless steel saucepan or pot.  Use twice as much milk as the volume of greek yogurt you wish to produce.  Therefore, if you wish to end up with 1 Quart of thick greek yogurt, start with 2 Quarts of milk.

Step 2:  Cover pot with a lid.  Heat on medium to medium high heat until milk reaches 180 degrees F.*  Stirring is not required.  Stay in the kitchen and monitor the temperature every few minutes if your thermometer doesn't have an upper limit alarm.  Once the temperature gets above 140 F it goes fast, so stay close.  You do not want the milk to boil!

Step 3:  Remove saucepan from the stove onto a heat resistant surface or cooling rack.  Remove lid.  Allow milk to cool to 120 degrees F.  This will take 30 minutes or so.  If you're in a hurry, place the saucepan in a cold water bath in the sink and stir to speed up this process.

Step 4:  Add yogurt starter to cooled milk at a rate of 2 Tbsp starter to 1 Quart of milk (for powdered starter follow label instructions).  If making more than two quarts, you may stir gently to distribute starter throughout the milk, but it isn't necessary for small batches.  Yogurt culture is active between 90 and 120 degrees, so don't worry if your milk has cooled somewhat below 120.  The point is that you don't want to put the starter in milk warmer than 120 or you will kill the starter.

Step 5:   Add up to 6 inches of hot tap water to the cooler.  It's best if the water isn't too much above 120 degrees.  If your water heater is on steroids, test the temperature of the water to make sure it isn't above 130 degrees.  Place the cooler somewhere it won't be jostled or moved while the yogurt is fermenting.

Step 6:  Place saucepan into the cooler, making sure that the water is not in danger of flowing into the milk in the saucepan.  Water on the outside of the pan should be about the same level as the milk inside the pan.  It's ok if the pan floats.  If your saucepan won't fit in the cooler but you have another metal or glass container that does, it's fine to transfer the milk.  Do not cover the milk.

Step 7:  Close the lid of the cooler and set your alarm to come back in 24 hours.


After 24 hours your milk will have been transformed into yogurt!  There may be some separation of the curd from the whey.  It will have a sharp acidic smell and taste that is likely stronger than you are accustomed to from storebought yogurt.  If you don't like it that strong, try checking after 12 or 18 hours of fermentation.

Fresh, warm yogurt is still rather runny.  You may eat/drink it at this point, or refrigerate to thicken, or you may strain out the whey to turn it into thick Greek style yogurt.


Step 8:  Place colander/strainer inside a large deep bowl or pot so that it is suspended 4 or more inches from the bottom.  Line the colander with cheesecloth.

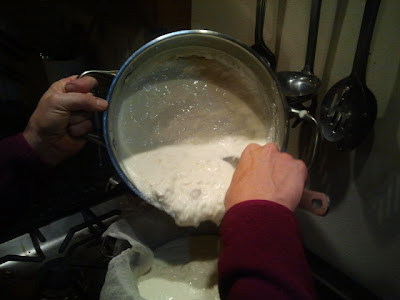
Step 9:  Slowly pour or spoon fresh yogurt into the cheesecloth (it will splatter so take your time with this).  Cover with a lid or towel and set an alarm for 12 hours.  I strain my yogurt at room temperature, where it will continue to ferment if there is any sugar left in the yogurt.  You may also refrigerate it during this process if you prefer.

After 12 hours, turn the thickened yogurt into a storage container and refrigerate.  It will keep in the fridge for a week, possibly longer.  (It never lasts that long at my house!)


Add flavorings when serving - favorites at our house include:

  • Vanilla extract
  • Sweetener of choice (honey, sugar, stevia, etc)
  • Berries and preserves


* Heating the milk to 180 breaks down the sugars in the milk a bit and makes them easier for the yogurt cultures to digest, which results in a shorter processing time with a better set.  I don't recommend skipping this step.  I have tried to shorten the prep time by heating the milk only to 120, but the results are not as good. 

Pictures


In the cooler

A good set after 24 hours

Strainer and draining pot.

Cheesecloth - ready for yogurt

Spooning it in
The finished product - after 12 hours of straining.


Sunday, March 25, 2012

Why Prune?

Have you ever wondered -- why should I pay someone to prune my fruit trees?  Don't they just... grow?

Yes, they grow.  Boy howdy do they grow.  Too much.  If left to itself, a fruit tree will grow upward like mad and you'll end up with a crowded tangle of a tree that will give you small, bland fruit, if it gives any fruit at all.

In order to grow into a strong tree that produces large, sweet fruit, all fruit trees need proper training.  Training is the multi-year process of shaping a young tree through selective pruning cuts and directing branches to grow in the desired direction through spreading or staking.

A properly trained tree will have sturdy, widely angled branches that will not split or break under the weight of a heavy fruit crop, and it will be shaped according to the specific variety of fruit tree to maximize light penetration for fruit production.

After training, some trees such as apricots, pears, apples, and plums need only light maintenance pruning to take out old unproductive wood, branches that interfere with the proper shape of the tree, and damaged or diseased wood.  Peach trees need a yearly hard pruning to promote growth of new productive wood.  A peach tree that is left un-pruned will slow its growth and stop producing fruit after a few years.

Below is a young peach tree before and after its annual pruning.
Courtesy of http://inorganicgardening.blogspot.com

It seems extreme to the untrained eye, but this is an example of how hard a young peach tree needs to be cut back in the spring to stimulate growth of new productive wood.

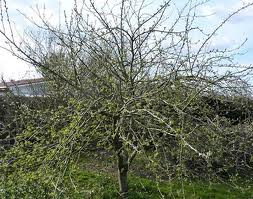
Below is an apple tree, still in the training stage, before and after pruning:

Courtesy of http://inorganicgardening.blogspot.com

 If a fruit tree is not trained into a healthy form, this is what you'll end up with :

(Courtesy of http://meousecrafts.com)


There are trees that require very little care to look good.  Those trees are not fruit trees.  If you're planning to invest time and money in a fruit tree, why not complete the process by giving the tree proper training and pruning.  You can take a class or buy some books and train yourself or hire a skilled fruit tree specialist to train and prune your trees.  They will repay you many times over in sweet, luscious fruit.


Monday, February 20, 2012

The Greenhouse


I've been starting seeds under lights in the basement for years, and have had reasonably good results doing that. I always fantasized about having a little greenhouse, but had nowhere to put one, and felt like the prefab kits were too expensive... so I relegated my want to the category labeled "dreams".

Then last year, Susan caught Flower Fever, and we ordered and started scores of flower seedlings under the lights. Suddenly, my humble four fluorescent-light fixture setup wasn't enough room. My tomatoes and peppers were fighting for space with Black Eyed Susans, Zinnias, African Daisies, Thunbergia, and Morning Glory. I had to clear another shelf and scavenge light fixtures from the ceiling of the storage room to provide light for everything. It was bordering on ridiculous -- I wish I'd taken a picture of it.

It was clear that the time had come to make my greenhouse dream a reality.

Last October, the project began. We decided we could fit a narrow lean-to style structure on the south side of the garage. It looked like this when we started (after we moved the grapevines that were formerly in residence).


Note: the worker removing the siding, who shall remain nameless, got a little carried away before I remembered to snap a "before" picture. Ahem.

Feeling pressure to get the structure up and shingled before the Winter-That-Never-Was hit, we worked hard for a couple of weeks. Tom took at least three days off work to help make it happen. Of course you know how it really went: HE did all of the heavy work and I spent my time on the fun parts that didn't require much upper body strength. Obviously, I couldn't have done this without him!

I'll spare you the blow by blow (believe me I have pictures of every step!), but by Thanksgiving this is what we had accomplished.


Here's a view from the interior after the benches went in.

Those 55-gallon drums (thanks dad!) supporting the benches are filled with water, which soaks up heat from the sun and slowly releases it at night, helping to keep the temperature inside well above freezing on all but the coldest winter nights. Just in case, I have a space heater on a thermostat that starts up if the temperature gets below 40 degrees.

Once the structure was weatherproof and insulated, we worked on it in fits and starts through the winter, adding siding to match the house, a door into the garage, a workbench and shelving at the west end, lighting, a thermostat controlled exhaust fan, and finally this weekend--a water line!

And just in the nick of time too -- because growing season is upon us!


*short pause while I do the Dance of Joy*


Here's the OUTSIDE on Sunday afternoon:


While THIS is going on INSIDE:

Working in the greenhouse in shirt sleeves is akin to a time-warp. I keep forgetting it's still February!

I WUB MY GREENHOUSE!

There's just one teeny-weensy problem: Already I wish it were bigger!

Tuesday, February 14, 2012

Seedlings


We are implementing a new system for growing seedlings here at the Funny Farm:

Soil Blocks

Soil Blocks are formed from a peat moss and compost soil mix by pressing with a hand-powered soil block maker. The result is a freestanding block of soil that is very space efficient and requires no container other than the flat it is placed in.


They're cute, but What's the Big Deal, you ask?

If you have ever purchased veggies or flower seedlings in those black plastic cell-packs, you have probably noticed that they are usually "root-bound", with the white roots circling the inside of the plastic container they were grown in. If planted as is, the roots tend to continue this habit, and when you pull out the plant at the end of the growing season, very often the roots look pretty much like they did when you started -- there is still that distinct "plug" that you planted way back in May!

Some gardeners (and I was among them) try to stimulate root growth by squeezing this root-bound cell, cutting the sides of the root-ball, or worse, tearing off the bottom half inch or so of the root-mass, especially if the roots are severely overgrown. This does stimulate more root growth but causes trauma to the plant, known as "transplant shock", evidenced by your newly planted seedlings just sitting there for a up to a week while they struggle to regrow those damaged roots.

This is where Soil Blocks shine. Because there are no plastic sides, the roots of the plant are air pruned and the plant can not become root-bound. This practically eliminates transplant shock, leading to faster maturity and possibly higher yields.

This makes it much easier to start indoors even difficult to transplant vegetables like peas, melons, corn, carrots, spinach, and other plants that are typically direct seeded into the garden later in the season.

I played around with it a bit last year and I was very pleased with initial results.

The Funny Farm is offering soil block grown snap peas, broccoli, cabbage, spinach, and leaf and romaine lettuces for mid march planting dates on a pre-order basis.  Tomatoes, peppers, onions, herbs, cucumbers, melons, summer and winter squash will be available for sale in May.

If you are interested, please call Lisa at 615-9623

Monday, February 13, 2012

When a Hobby Becomes a Business


Here at the Funny Farm we've decided to share our love of plants with a wider audience. I get so many requests for help with fruit tree selection and pruning, rose care, and other garden questions that I've decided to make it official: The Funny Farm is now open for business.

I have no plans to charge for helping anyone with garden and tree questions -- I love to talk about it too much to get paid for that. And truth be told this little venture is more of a tax shelter than a real expectation of making much money.

Beginning now, I am offering fruit tree and small ornamental pruning services at very reasonable rates. We will also offer flower and vegetable seedlings in a limited basis later in the spring, as well as garden produce in season.

I'll be posting in the future about all of these services and more, but today let's talk about fruit tree pruning.

There are a lot of people who want to grow their own fruit or may have purchased a house with existing fruit trees but haven't the least idea how to train and care for them in order to ensure maximum tree health and years of optimal fruit production.

Sometimes folks have basic knowledge about pruning and keep meaning to get out and prune their trees, roses, lilacs, and other flowering shrubs but life keeps getting in the way and before they know it, the window of opportunity has passed. Don't let that happen to you this year.

I know what you're thinking: It's only February... no need to worry about pruning trees until March or April, right? Answer: Yes and No. Pruning Peaches, Nectarines, Apricots, Cherries, and Plums too early can bring on early blooming, so I recommend waiting until the buds are getting fat or even open bloom before pruning these fruits, usually in late March through April. Apples, Pears, Grapes, and Berries can be pruned much earlier. I typically begin work on these four in February. So if you have an Apple, Pear, Grapevine, or Raspberries/Blackberries you'd like help with, now is the time to get on the schedule, because once Peach pruning season hits, it's uncertain if I'll have time to help with these other fruits.

Speaking of peaches, I can't stress enough the necessity of a thorough annual pruning to stimulate new growth which will promote tree health and ensure a plentiful crop of luscious fruit year after year. Not only does fruit production dwindle on neglected Peach trees, but what fruit is produced will often be less flavorful due to inadequate sunlight and air circulation. In addition the health and vigor of the tree suffers, making it more susceptible to disease and insect invasion.

Grapevines put forth 4+ feet of new growth each season, and without careful training and annual pruning grapes can quickly get out of control. Because of this, many people are afraid to plant grapes and miss out on the beautiful landscaping potential of this wonderful fruit. Grapes can be trained on a sturdy fence, wall, or arbor and once established do very well with little to no fertilizer or extra water, producing sweet juicy fruit for decades. With yearly pruning, Grapes are as close to getting something for nothing as it gets!

Raspberry and blackberry canes need pruning as well, and it isn't always as simple as just cutting them off at the ground. There are Summer Bearing raspberry varieties that bear fruit only on last year's canes, and those must be pruned differently than a Fall Bearing raspberry like Heritage. Blackberries are vigorous once established, and require annual thinning and pruning to cut out old wood and keep new shoots coming to ensure good fruit production as well as to contain the plant and make it easier to pick this wonderful fruit. Considering how expensive they are in the stores, I think everyone should have at least a few blackberries and raspberries in their garden.

I can also help with the pruning and care of small ornamentals including roses, lilacs, snowball bushes, and other flowering shrubs. Often neglected due to owners being unsure how to prune, these plants grow healthier and bloom more vigorously with regular renewal maintained by selective pruning of old wood.

To clarify, I am not an arborist. I do not have the equipment, the physical strength, nor the death-wish necessary to perform large tree services or tree removal. There are plenty of folks in the phone book you can call for that. But if you need someone with know-how, passion, and experience in pruning all kinds of fruit producing plants, The Funny Farmer is the one to call.

As always, if you have any questions, you can post them below or contact me directly at 615-9623.